
Context
For a while, I have been wanting to improve my practical knowledge about networking and system administration. Until now, it was limited to university projects and the administration of my Ubuntu-based laptop and an old HP OptiPlex hosting a few services. On top of that, I had this big list of services that could be self-hosted to replace paid or third-party services. Two events triggered what would then become an infinite rabbit hole, both caused by my friend Julien: him introducing me to Nix, and later, to the concept of mini rack.
The NixOS ecosystem
Plenty of blogs or tutorials present NixOS and Nix in detail, such as [1], so I’ll keep this short. NixOS is a Linux distribution based on Nix, a package manager and build system. Nix is declarative, meaning that given configuration files specifying a system state, it will perform all required operations to reach that state. This leads to configurations with a high level of abstraction. For instance, with the following configuration, Nix will automatically:
- Build (or more likely download from the binary cache) nginx and its dependencies.
- Generate an nginx configuration for our virtual host, including its document root, TLS configuration, ACME challenge handling, and a policy to enforce HTTPS.
- Generate an ACME configuration, including systemd units to request a certificate for the virtual host and a timer to automatically renew it.
- Update the firewall policies to allow connections on the 80 and 443 ports (software-agnostic).
- And then activate all services: nginx, the ACME client will contact Let’s Encrypt to issue the certificate.
services.nginx = {
  enable = true;
  virtualHosts."gquetel.fr" = {
    enableACME = true;
    forceSSL = true;
    root = "/var/www/blog";
  };
};

networking.firewall.allowedTCPPorts = [ 80 443 ];

security.acme = {
  acceptTerms = true;
};
The idea of having a set of human-readable configuration files that describe the state of my machines made NixOS an appealing candidate for administering my machines. This is complemented by other mechanisms, such as generations. A generation is the system state at a given point in time. If a configuration modification leads to unwanted system behaviour, it can be fixed using a simple rollback to a previous stable system state. Furthermore, the operating system is relatively trendy (not that it matters so much), but the consequence is a growing ecosystem, with very convenient tools such as colmena, for instance, which make deployment of configs on multiple hosts very easy. A year ago, I decided to give it a try, and since then, for nothing in the world I would go back to imperative Linux distributions.
What is a Mini Rack ?
Shortly after, Julien sent me a video about Jeff Geerling showing a mini rack he built: a compact homelab. Essentially, it consists of a few machines and a switch connected together that takes less space than your typical server rack. While the standard for a typical rack is 19 inches, their objective is to find hardware that fits in a 10-inch rack.
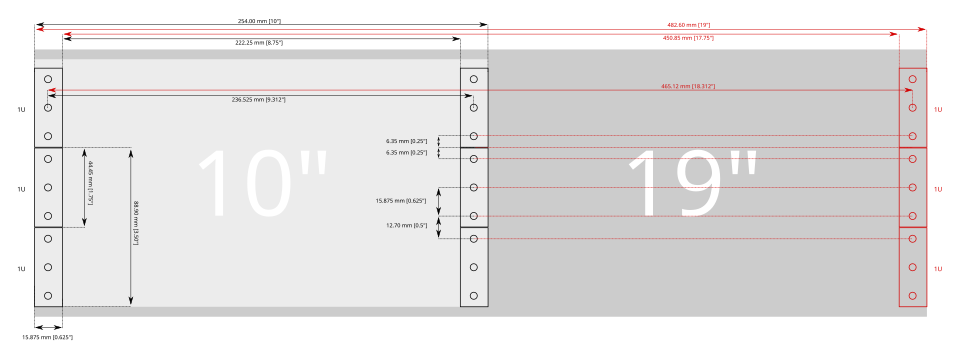
Tacit standard for the 10 inches rack
Building mini-racks is facilitated due to the existence of Ultra Small Form Factor (USFF) machines. They possess low power consumption and allow building relatively silent homelabs. In my case, this is required since it will be located in the living room. A whole community exists around the concept of these 10-inches mini-rack. Rack ideas are presented and discussed on Jeff Geerling’s repository and on the r/minilab subreddit. It only took a few seconds of scrolling through these pages for me to want to build my own, allowing me to further tweak with NixOS, and finally start to self-host some services. This post, therefore, presents my homelabing journey. First things first: the hardware components.
The Hardware
I am a PhD student, ergo I’m on a budget. You will not find components with crazy specs here. Furthermore, this mini-rack project is evolutionary, the idea is to start small to gain hands-on experience and to invest in more expensive components as my needs evolves. Currently, these needs are far from enormous: a few machines to create an interesting networking system, with enough computing power to host some services. Still, we need a whole list of basic components to build our mini rack. The very first constraint for all components is the size of the rack cabinet.
Cabinet
The rack cabinet is the casing used to mount and organize the different machines. As said, the tacit standard is 10-inches wide. The height of a rack is measured in rack units (U), where 1U corresponds to 44.45 mm. A few comments on the minilab subreddit recommended buying a cabinet with a few extra rack units, as you always end up wanting to add more components than initially planned.
Ideally, I would like to host three to four machines to learn about networking (3–4U), a switch (1U, plus an additional 1U for a brush grommet to route cables cleanly), and some hard drive storage (2U). This brings the total to more than 8U, so I targeted a cabinet larger than that. A common choice in this space is the DeskPi RackMate, which comes in 10U and 12U variants. However, it seemed somewhat pricey, especially given the shipping costs.
Instead, I looked for European-based companies producing similar racks and found Stalflex and its 10-inch product range. I went for the 12U cabinet for extra space. Since the company also sells compatible accessories, I purchased a few shelves, a brush gommet, and some mounting screws (the full list of components is available at the end of the article). Kudos to the Stalflex team, I was very happy with their products, price, shipping, and customer service :)
Machines
Different models of USFF computers fit into 1U: Lenovo ThinkCentre micro, HP EliteDesk or Dell OptiPlex. Second-hand IT equipment specialized websites list such computers, but at a relatively high price, so that wasn’t really an option I considered. eBay was one, so as Leboncoin (a French second hand website). However, their prices weren’t really attractive. Luckily, a few days after I started looking for machines, listings for second-hand ThinkCentre M710 units appeared on the French auction website Moniteur des Ventes. They were sold in batches of 20, but no details were given about their specs, so this was a lottery. Julien and I ended up winning 2 batches, thinking we could resell the surplus (which we eventually easily did on Leboncoin).

The 40 Thinkcenters on my sofa
Unfortunately, all the machines are equipped with an Intel G3930T, a processor with 2 cores and 2 threads. According to the platform specification, we knew that the motherboard was compatible with some i7 processors (4C/8T). So one of the future upgrades might be buying some bigger processors, but until now, CPU hasn’t really been a bottleneck for my use cases.
Switch
The cabinet will be placed next to an Ethernet wall jack. A switch is therefore required to connect my different servers to this single line and allow them to communicate with each other. Two types of switches exist: unmanaged switches, which are essentially plug-and-play and offer no configuration options or management interface, and managed switches. The latter provides additional features and greater customizability, such as the creation of virtual networks (VLANs). While working with such devices can be interesting to gain practical experience with these technologies, a plug-and-play switch is sufficient for my current use case, which is essentially port expansion.
As mentioned earlier, I will connect my switch to my ISP router using an Ethernet cable. Because my plan limits download and upload speed to approximately 1Gbps, I do not need a switch with an SFP+ port that supports higher bandwidth for now. I also have no need for Power over Ethernet (PoE), so an unmanaged 1U switch with roughly 8 ports should do the job. The ThinkCentre systems are equipped with Ethernet controllers that only support 1 GbE, so expensive switches will be overkill without replacing those. Therefore, I chose to go for the Netgear GS308. It offers up to 1Gbps per port, has 8 ports, and will require either a shelf or 3D-printed mounting ears to be properly installed in the cabinet.
To connect the machines to the switch, I need RJ45 Ethernet cables rated Cat 5e or higher to support 1 Gbps bandwidth. I found some Cat 7 cables at a low price. While this is overkill for the current setup, they can be reused if I upgrade the hardware in the future.
And well, that’s pretty much all I needed to get this project started. Here is the first version of the mini-rack, with our switch, the old OptiPlex that fits in the cabinet, and one of the refurbished ThinkCentre:

Mini-rack version 0.1
Upgrades
Now the upgrade iterations can begin. I added two additional machines to form something resembling a cluster and to learn more about networking stacks such as tailscale. The first hardware upgrade I performed was adding more RAM to the machines.
RAM
Upon receipt, some ThinkCentre units had a single 4 GB stick, others had 8 GB. An easy upgrade (and necessary if I want to be able to run to Virtual Machines) is to replace those by higher capacity sticks. The ThinkCentre has two DDR4 SO-DIMM, non-ECC slots. The current CPUs (G3930T) support DDR4 memory up to 2133 MHz. RAM sticks rated above this frequency will simply be downclocked. So while purchasing RAM sticks faster than 2133MHz is overkill for now, they could be reused if I later upgrade the CPUs. Through Leboncoin, I managed to find someone that bulk sells RAM sticks and grabbed 10 sticks of 16GB DDR4-3200, replacing the original memory in the machines.
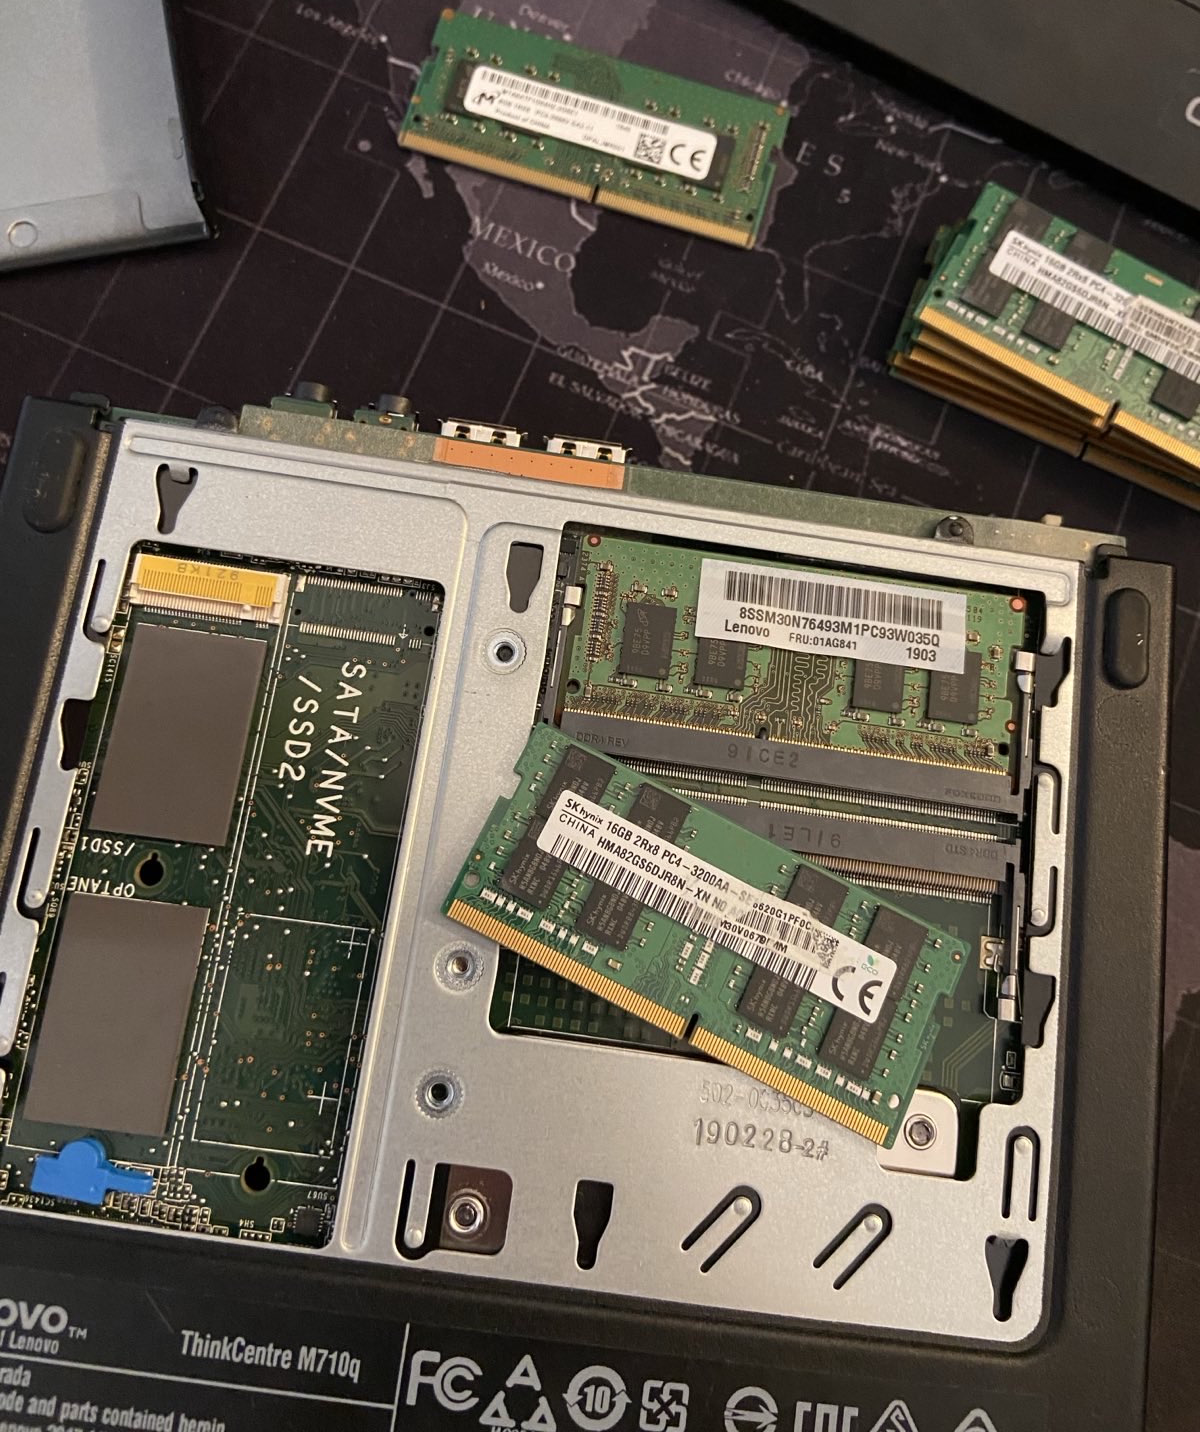
Replacement of the RAM sticks.
Storage
Before long, the disk space on my machine, which was storing backups and other media, became full; a single USB-plugged external hard drive was not sufficient. Ideally, I would like to be able to plug multiple hard drives for large storage capabilities for my media, and for the important ones, redundancy. I would like to be able to plug in at least four hard drives for a medium-term solution. Since I mainly need storage for media, HDD drives are sufficient. However, relying on external hard drives via USB is not a viable option, as they are limited in terms of storage capacity. Therefore, internal HDD drives seem like the way to go, but two things must be figured out for this type of hard drive: how to transfer data and how to power the drives.
External drives typically use either SATA or SAS interfaces for data transfer. However, the Thinkcenter only possess a single SATA port, already used by the SSD they are shipped with. No SAS port exists as this is mostly used by bigger machines (such as 19inches servers). Furthermore, we saw earlier that the ThinkCentre are machines with low consumption, the alimentation is 65W. We cannot rely on this power supply to plug 4 HDD drives that consume on average up to 12W each (numbers taken from the 8GB Seagate HDD ST8000NM0045). Hence, we will have to rely on an external power supply.
To power the drives, we require an external power supply providing direct current (DC) of 12V and 5V with enough current capacity (up to ~70W for 6 drives at spin-up time). To do so, we can rely on a picoPSU. It takes an input voltage of 12V and provides the power rails of 12V and 5V required by the drives at 200W. In practice, a standard power brick is connected to the input of the picoPSU, while the output exposes connectors to which SATA power adapters can be plugged. I grabbed these components from AliExpress since all other options were dropshipping websites taking a huge margin on them.

The picoPSU, a compatible power supply, and the 5P-4 SATA power cable.
For data transfer, we saw earlier that the ThinkCentre lacks available SATA ports. However, as shown in the previous photo illustrating the RAM upgrade, there is an unused M.2 PCIe slot. Some expansion cards take advantage of the bandwidth provided by this slot to expose multiple SATA ports. I purchased such a card, along with SATA data cables, and used a spare SATA drive to test this setup with the ThinkCentre.

The M.2 PCIe to SATA ports extension card, SATA data transfer cable and some used HDD drive.
The picoPSU has two modes for powering the drives: either the drives are always on, or a synchronization cable can be plugged into the motherboard. When the machine starts, a signal is sent to the picoPSU, which then powers the drives. Unfortunately, there does not appear to be any connector for such a cable on the ThinkCentre, so I will have to set the picoPSU to always-on mode. I plugged everything in and ended up with this cursed setup, with wires everywhere:
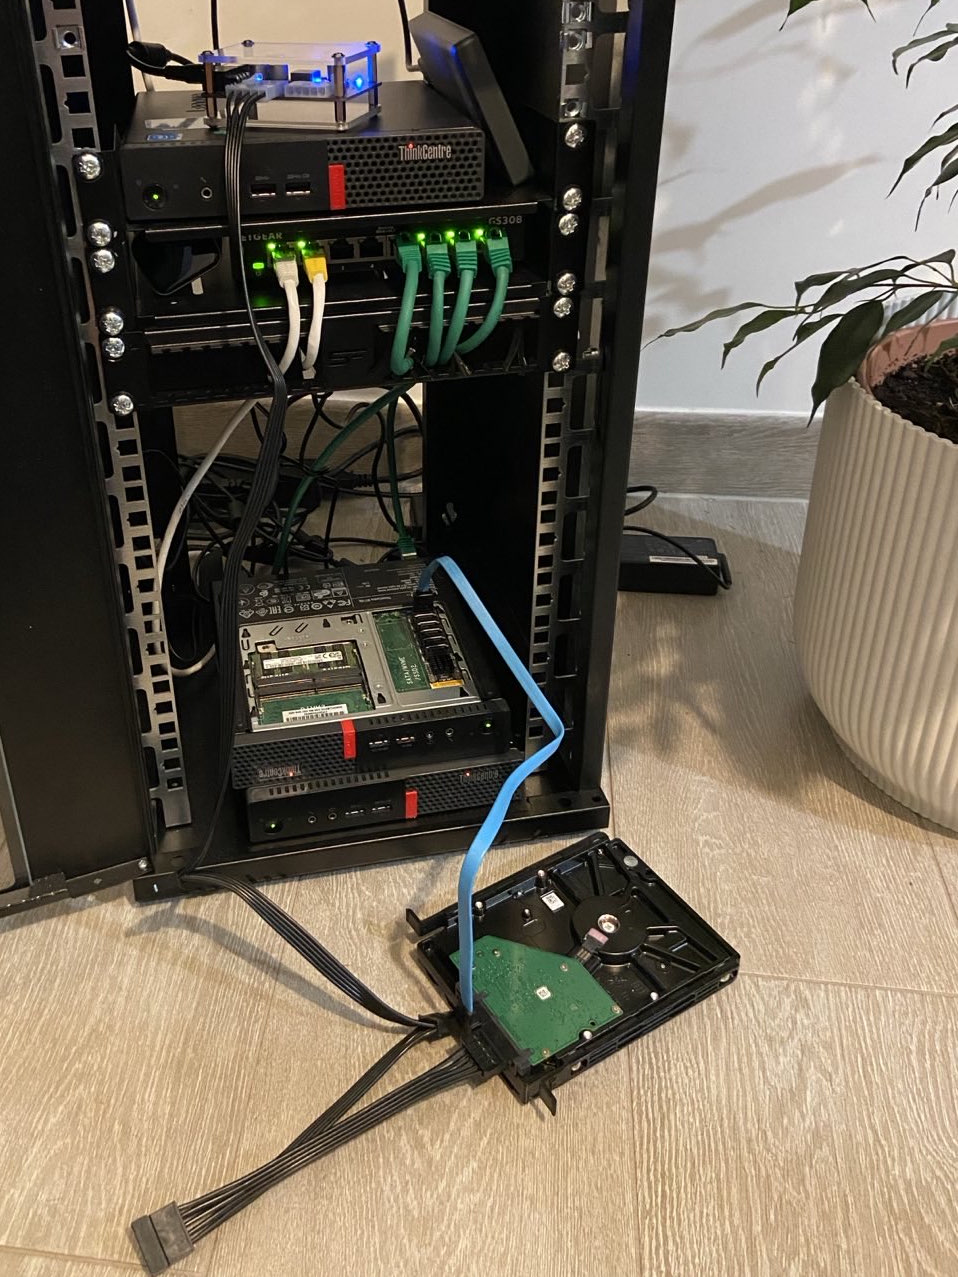
"Temporary" testing setup, using the picoPSU, the adapter and a spare drive.
But while it looks like a mess, it worked flawlessly:
❰gquetel❙~❱✔≻ lsblk
NAME   MAJ:MIN RM   SIZE RO TYPE MOUNTPOINTS
sda      8:0    0 465,8G  0 disk
├─sda1   8:1    0     1G  0 part /boot
└─sda2   8:2    0 464,8G  0 part /nix/store
                                 /
sdb      8:16   0   1,8T  0 disk
├─sdb1   8:17   0   1,8T  0 part
My hard drive was correctly powered on and recognized by the ThinkCentre. Since the test worked well, I searched for disks with higher storage capabilities on (again) Leboncoin and managed to grab two unused 4TB disks for 40€ each (a bargain). From those two physical disks, I used zfs to create a unique logical storage space (a pool), where I’ll be able to store all of my media. zfs makes it easier to manage these physical drives and add new ones to extend the storage of the pool.
❰gquetel❙~❱✔≻ zpool list
NAME     SIZE  ALLOC   FREE  CKPOINT  EXPANDSZ   FRAG    CAP  DEDUP    HEALTH  ALTROOT
mmedia  7.25T  1.50T  5.75T        -         -     1%    20%  1.00x    ONLINE  -
With that done, the rack is currently a mess, especially because I only printed a single ear for the ThinkCentre, which still needs some fine-tuning to look good. However, this is a good first version of the mini-rack, and it already allows for hosting many services as well as learning about services deployment and networking.

Mini-rack V1.
Conclusion
That’s it for the hardware details for the first version of the mini-rack. All the components are summarized in the following table, their price and where they got bought.
| Component | Bought at | Price1 |
|---|---|---|
| Cabinet | Stalflex | 46.97€ |
| Brush grommet | Stalflex | 4.45€ |
| Rack Shelf (x2) | Stalflex | 4.01€ (x2) |
| Mounting screws (x4) | Stalflex | 0.67€ (x4) |
| 16GB RAM sticks (x8) | Leboncoin, french second hand website | 15€ (x8) |
| ThinkCentre M710Q Tiny (x5) | Moniteur des Ventes, french auction website | 0€2 |
| Netgear GS308 | Amazon | 20.99€ |
| Ethernet cables | Amazon | 22.12€ |
| Power strip | Amazon | 29.97€ |
| M.2 to SATA adapter | Aliexpress | 15.19€ |
| picoPSU | Aliexpress | 22.99€ |
| picoPSU power supply | Aliexpress | 8.10€ |
| 4TB HDD SATA drives (x2) | Leboncoin, french second hand website | 40€ (x2) |
| SATA data cables | Amazon | 8.12€ |
Plenty of the upgrades already mentioned can be implemented in the future, such as installing more powerful CPUs to host virtual machines and printing additional components to properly rack the servers and disks. However, this setup already allows me to build a full network of machines and deploy services. The next article in this series will focus on the architecture of my network and the services deployed. If you want more detail about the mini-rack or have a specific question, don’t hesitate to send me a direct message on X or Mastodon !
Banner image: Eugène Delacroix (1841). Noces Juives au Maroc. Coll. musée du Louvre, Paris.
-
Prices does not include shipping, they may drastically vary depending on your region. ↩︎
-
40 ThinkCentres were purchased at auction for approximately €975. We gave a few units to the friend who picked them up at the auction house on the other side of France and transported them to Paris. We kept some for ourselves and sold the remaining 25 for about €40 each, meaning the ThinkCentres pretty much paid for themselves. ↩︎